USB/XLR Dynamic Mic: Gain, Monitoring & Mute Setup
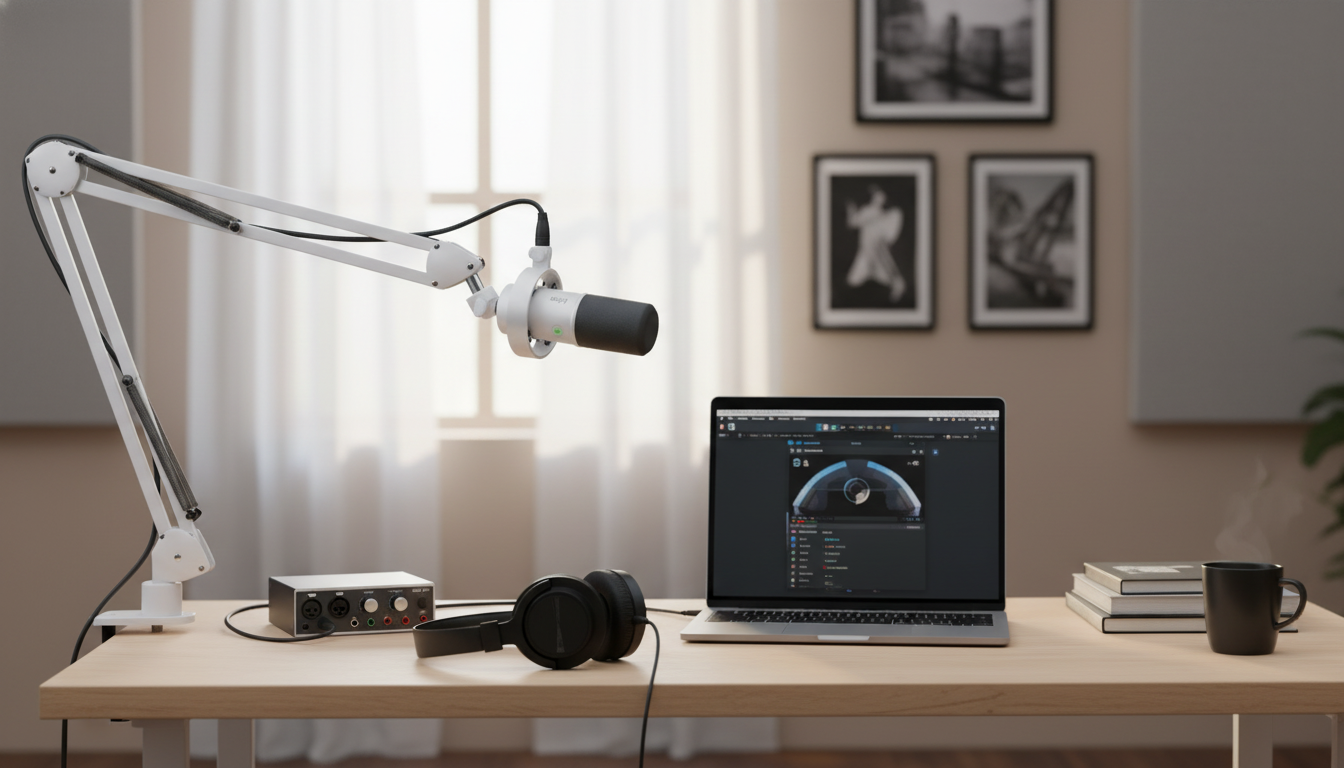
USB/XLR Dynamic Microphone with Gain Control, Real-Time Monitoring & Mute
A dual-connection dynamic microphone can simplify a recording setup without limiting future upgrades. With USB for quick plug-and-play use and XLR for pairing with mixers or audio interfaces, this style of mic fits streaming, podcasting, voiceover, meetings, and music demos. On-body gain, a one-touch mute, and real-time headphone monitoring help keep levels steady and reduce the need to fix problems after recording.
What a USB/XLR dynamic microphone is (and why it’s practical)
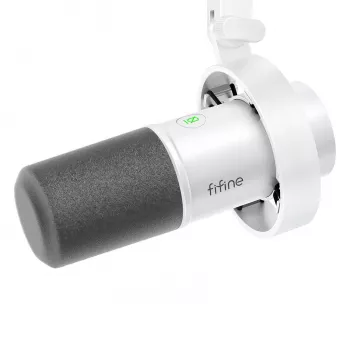
A USB/XLR dynamic microphone combines a dynamic capsule—often favored for voice—with two common ways to connect: USB for computers and XLR for traditional audio gear. Dynamic designs are frequently chosen for spoken word because they handle louder sources well and typically reject more room sound than many condenser mics, which can be helpful in untreated spaces. (For a deeper overview of how dynamic and condenser microphones differ, see Shure’s explanation.)
USB routes audio straight into a laptop or desktop for fast setup with conferencing apps and recording software. XLR keeps the door open for an interface or mixer, which can add cleaner preamps, multiple mic inputs, and hardware processing. The practical win is longevity: you can start simple and grow into a fuller audio chain without replacing the mic.
Gain control: setting a clean level quickly
On-mic gain control is about getting a strong, clear signal without distortion. A good target is consistent, healthy peaks rather than constantly riding the knob mid-sentence. If your recording sounds thin or noisy, gain is often too low (and software boosting drags up hiss). If it sounds crunchy on loud words, gain is too high, or you’re too close.
A reliable starting routine is: set gain low, speak at your loudest expected volume, then raise the gain until your voice sounds present and stable. Keep distance consistent—often around 4–8 inches for speech—and angle slightly off-axis to reduce plosives and harsh consonants. If you’re using XLR, remember the interface or mixer also adds gain; avoid cranking both stages aggressively.
Quick level check for common voice use
| Scenario | What to listen for | Adjustment |
|---|---|---|
| Voice is quiet, lots of hiss | Background noise rises when you boost in software | Increase mic gain and move slightly closer; reduce software boost |
| Voice distorts on loud words | Crackling/harsh clipping on peaks | Lower gain; increase distance slightly; keep consistent speaking volume |
| Boomy or muddy tone | Low-end buildup, unclear articulation | Back off 1–2 inches; speak slightly across the mic; consider a pop filter/windscreen |
| Plosives (P/B pops) | Air blasts hit the capsule | Angle the mic 20–45° off-axis; add a pop filter; increase distance slightly |
Real-time monitoring: hearing what’s actually being recorded
Real-time headphone monitoring is one of the fastest ways to improve results because it reveals problems during the take—clipping, background noise, mouth clicks, or a chair squeak you didn’t notice. Low/zero-latency monitoring is especially valuable when computer settings introduce delay, which can make speaking feel unnatural.
Keep headphone volume comfortable. Monitoring too loudly often makes people talk louder, which can overload the mic and push consonants into harshness. In streaming, monitoring helps you maintain a steady voice-to-game balance. In meetings, it helps you notice when you drift away from the mic or turn your head. If your app’s software monitoring creates echo or delay, disable it and rely on direct monitoring when available.
Mute control: avoiding accidental hot mics
A dedicated mute button is a simple feature that pays off daily. It’s handy for live calls, quick breaks during streams, coughing, or anything you’d rather not capture. Mute works best as a safety tool—not as a substitute for good positioning or a quieter room.
A helpful habit is a quick “mute check” before speaking again, especially if the mic has a status indicator. For creators, using mute proactively can also reduce editing time by keeping unwanted noises out of the recording in the first place.
USB vs XLR: choosing the right connection for the setup
Most dynamic microphones do not need phantom power on XLR, and enabling 48V is usually unnecessary. For best results with either connection, keep cables tidy, avoid running audio cables alongside power bricks, and use stable USB ports or a quality powered hub. If electrical noise appears, try another USB port, shorten cable runs, and keep the mic away from Wi‑Fi routers and monitor power supplies. For software input selection and device troubleshooting steps, the Audacity recording guide offers a clear reference that applies broadly to many apps.
Placement tips for clearer speech in untreated rooms
Everyday use cases: streaming, podcasting, work calls, and demos
Streaming
Podcasting
Work calls
Voiceover practice
Music demos
Care, accessories, and simple troubleshooting
Recommended in-stock picks
- USB/XLR Dynamic Microphone with Gain Control, Real-Time Monitoring & Mute ($72.51) — Dual USB/XLR connectivity with on-body control for level, monitoring, and quick muting.
- Lightweight Waterproof Down Tote Bag ($87.17) — A practical carry option for transporting a compact recording kit, cables, and small accessories.
FAQ
Does a dynamic USB/XLR microphone need phantom power on XLR?
Most dynamic microphones do not require phantom power, so 48V is generally unnecessary. If you’re unsure, check the microphone and interface/mixer documentation before enabling phantom power.
Why do headphones sound delayed when monitoring?
That delay is usually caused by software monitoring through the computer (latency). Use direct/real-time monitoring when available, or reduce the buffer size in your recording app’s audio settings.
What’s the quickest way to reduce room echo and background noise?
Move the mic closer and lower gain, speak slightly off-axis, and add a pop filter. Softening the room with rugs, curtains, or absorbent materials behind you can also reduce reflections quickly.


Leave a comment