Build a Vintage Train Book Nook: DIY 3D Puzzle Bookend
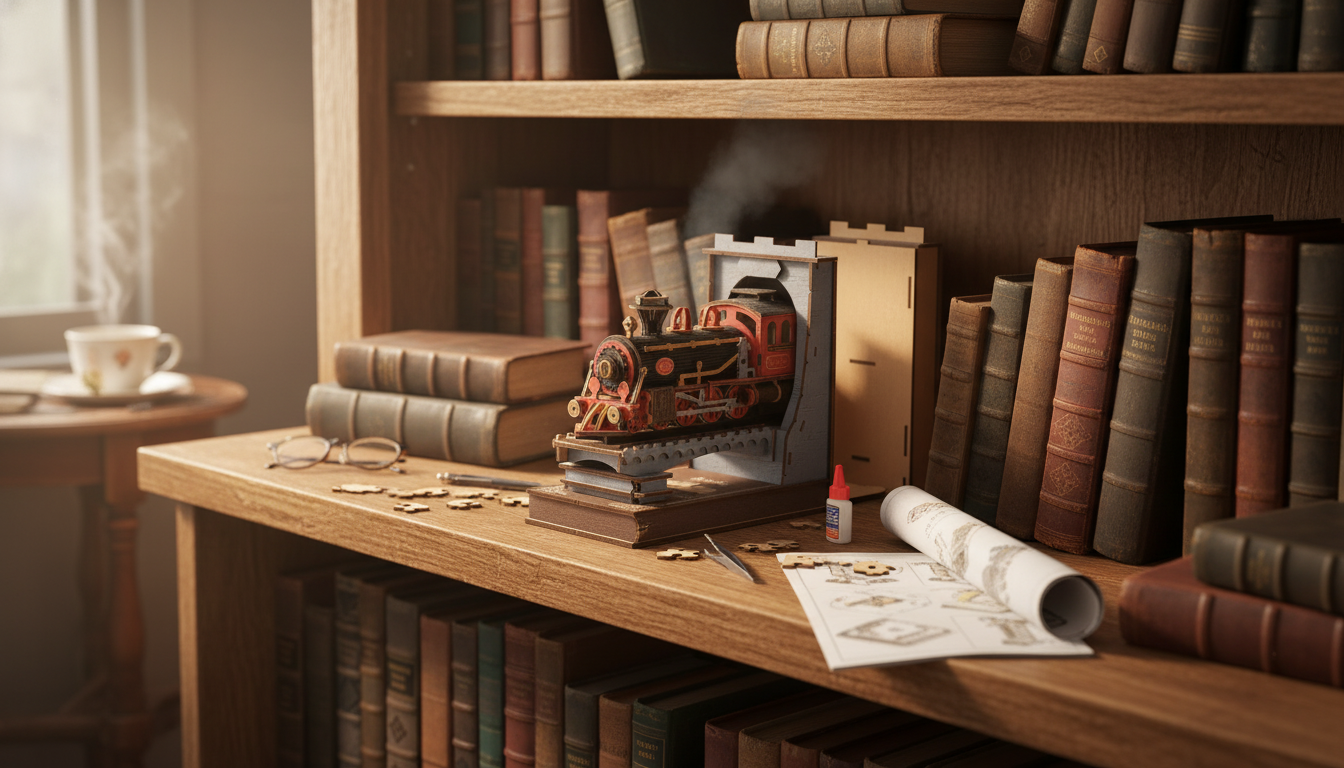
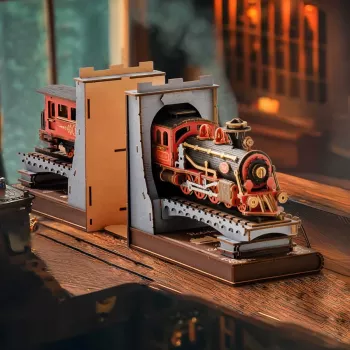
A vintage train-themed book nook combines hands-on building with a finished display piece that fits between books like a miniature scene. This kit-style 3D wooden puzzle is designed for adults and teens who enjoy crafting, model building, and shelf décor—offering a relaxing project and a conversation-starting bookend once complete.
What Makes a Train-Themed Book Nook So Satisfying
A book nook is one of those rare projects that feels useful and artistic at the same time. Instead of building something that ends up in a drawer, the finished piece becomes part of your everyday space—tucked between novels like a tiny window into another world.
- Blends a practical bookend function with a detailed diorama look on a bookshelf
- A focused, screen-free activity that suits weekend crafting sessions or slow evenings
- Train styling adds a nostalgic, “station platform” atmosphere that pairs well with classic novels, mysteries, and travel reads
- Great for shared building: one person can sort pieces while another assembles
That sense of nostalgia is part of the charm—railroads helped shape American travel and commerce, and the vintage cues (signage, windows, platform-like layers) tap into that timeless mood. For a deeper historical backdrop, the Smithsonian Institution is a reliable starting point for learning about railroads’ cultural impact.
Quick Facts at a Glance
This style of kit is meant to be approachable while still feeling detailed once it’s on your shelf.
- Designed as a 3D wooden puzzle book nook/bookend with a vintage train motif
- Suitable for adults and teens; recommended for patient beginners and hobby crafters
- Finished piece works as shelf décor, a bookend accent, or a desk display
Product Snapshot
| Detail | What to Expect |
|---|---|
| Product type | DIY wooden book nook / 3D puzzle bookend |
| Theme | Vintage train scene |
| Best for | Adults, teens, model-building and craft enthusiasts |
| Use case | Bookshelf insert, bookend accent, display décor, giftable project |
| Availability | In stock |
What’s Typically Included (and What to Prepare)
Most wooden book nook kits focus on precision-cut parts that fit together cleanly, plus layered decorative elements that create “depth” when viewed from the front of your shelf.
- Pre-cut wooden pieces for the structure and train-scene details
- Decorative elements that create depth (layered panels, windows/frames, signage-style accents)
- An instruction booklet or step sequence to guide assembly
- Helpful extras to have on hand: craft glue, tweezers, small file/sandpaper, a soft cloth for dusting, and a well-lit workspace
- Optional upgrades: cutting mat, precision knife for tiny tabs, and clips/rubber bands to hold glued sections while curing
If you’re gifting this to a teen or setting up a shared craft night, basic consumer safety guidance is worth a quick skim—especially around adhesives and small parts. The U.S. Consumer Product Safety Commission (CPSC) provides general product safety tips for households.
Before You Start: Setup for a Cleaner, Easier Build
A smoother build usually comes down to setup. A few minutes of prep can save a lot of “where did that tiny piece go?” moments later.
- Choose a flat surface with bright lighting; a desk lamp reduces eye strain during small-piece steps
- Sort pieces by size or by step group to avoid searching mid-assembly
- Dry-fit parts before gluing to confirm alignment and prevent warped joins
- Keep a small container for tiny components so nothing rolls away
- If using glue, ensure good ventilation and protect the surface with paper or a mat
Assembly Flow: A Calm, Step-by-Step Approach
This project rewards patience. Think of it as building a small stage set: frame first, focal point second, atmosphere last.
- Start with the base and side walls to establish a square, stable frame
- Build the train focal elements next so the centerpiece is set before adding background layers
- Add layered scenery panels from back to front to preserve depth and prevent hand placement from damaging delicate pieces
- Use minimal glue—thin applications reduce seepage marks and speed drying
- Let structural joins cure before attaching small decorative details (signs, trim, frames)
- Do a final alignment check so the finished nook slides smoothly between books without snagging
Difficulty, Timing, and Who Will Enjoy It Most
Expect a “slow craft” experience: small wins, step by step, rather than a fast afternoon makeover. It’s a great fit for builders who like process as much as the finished look.
- Best for builders who enjoy careful, methodical steps rather than fast crafting
- A strong pick for teens who like puzzles, miniatures, and hands-on projects
- Ideal as a low-pressure hobby for adults looking for relaxing, repeatable progress
- Consider splitting into sessions: structure first, details second, finishing touches last
Display Ideas: Making the Finished Book Nook Look Intentional
Once complete, a train book nook looks best when it feels “placed,” not just inserted. Small styling choices help it read like a curated shelf moment.
Care and Maintenance
Gift Notes: When This Kit Is the Right Present
Shop In-Stock Picks
- Vintage Wooden Train DIY Book Nook Kit – 3D Puzzle Bookend for Adults & Teens
- Sandalwood Backflow Incense Burner – Alpine Flowing Water Aromatherapy
- Lightweight Waterproof Down Tote Bag
FAQ
Is this book nook kit suitable for beginners?
Yes, it can work well for patient beginners. Dry-fit pieces before gluing, follow the steps in order, and use tweezers for small parts to keep alignment neat and frustration low.
Does it work as a real bookend or mainly as décor?
It’s primarily a decorative bookshelf insert and bookend accent that sits between books and adds structure and visual interest. Very heavy books may still need a dedicated sturdy bookend, with the nook serving as the centerpiece.
What tools or supplies are helpful to have ready?
Craft glue, tweezers, and a small file or sandpaper are the most useful basics. Clips or rubber bands can hold sections while curing, and good lighting plus a soft dusting brush help both during assembly and later maintenance.


Leave a comment